Showing posts with label tutorial. Show all posts

Old Stuff Day 2014

old stuff day is march 2nd; and what do you know that's today.  I know I haven't been blogging for quite some time now, but maybe that can change (I'm not betting on it; but I am trying :) )  Fornow I am doing the best I can to keep involved with the comunity off-line and here and there online; and since I've got some back log on articles I can easily join in on old stuff day; so here we go.

The article I'm submitting for Old stuff day is my candle tutorial, I chose that article 'cus I keep going back to it myself and beceause I get a lot of questions about my candles every time I post a picture of one of my blood angels.  The candles are reacuring theme on almost every base in my ever growing army.

Cheerz
Guido.

+++++++++++++++++++++++++++++++++++++++++++++++++

Apparentley due to new pollicy I get my White Dwarf a little later then the stores.  In my case that tends to make a subscribtion a little obsolete as the nearest retailer is almost literally next door.  But that and the fact that I had a working weekend did mean there was no update on the blog this weekend.  So let me make it up to you by doing another tutorial. In the meantime I get to remember how I do this stuff.  For the sake of pictures in this tutorial I didn't make the candles while on the base, but rather on the toothpick.

I’m not great at these thing, nor do I think I’m the great talent at painting or sculpting.  I do however bump on things I think are worth sharing with the rest of you.  One of these things are the candles I include on my Blood Angels.  As the picture shows; it’s all fairly straight forward.

First I use a tooth pick cut it to length.
Next up are the dripping lines.  I do those by just adding green stuff to the sides and making vertical carves with a needle like sculpting tool. Top of the candle is made by pushing a ballpoint tool on the top The drop is made by pushing at the end of the drop
Third part is the flame.  I do this by just rolling a little egg like form and carefully pushing it in place with the needle point (sometimes using a little glue)

I use greenstuff for these kind of things as it gives a better curing effect.  I like using brown stuff, but it gets a more straight finish; Green stuff tends to curve slightly when handled, and candles tend to do the same :o)

Hope it inspired some people.
If you’ve got pointers or experiences; let me know.

Cheerz
griffit

Wayback Wednesday Alien cactus


Greetz one and all, 

This weeks update could be a wayback Wednesday or even my first back issue and even fits in the war of Iron scenery :)  But first up a new “rule” in posting; for the moment it will be 1 post a week on Wednesday.  With the current buzz in the household I can’t push it much more.  Second I need to thank Steven, Yves and Pascal for the great ‘reenactment’ of “The War of Iron”.  I didn’t have such a great evening to start with, but the game made up for a great deal. It was a lot of fun guy’s, and I’ll give some more details next week :o)

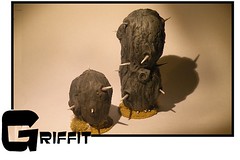
Again to the model; this is my interpretation of those way back cactuses from second edition; enjoy :)


cheerz
griffit

Tutorial Candles

Apparentley due to new pollicy I get my White Dwarf a little later then the stores.  In my case that tends to make a subscribtion a little obsolete as the nearest retailer is almost literally next door.  But that and the fact that I had a working weekend did mean there was no update on the blog this weekend.  So let me make it up to you by doing another tutorial. In the meantime I get to remember how I do this stuff.  For the sake of pictures in this tutorial I didn't make the candles while on the base, but rather on the toothpick.

I’m not great at these thing, nor do I think I’m the great talent at painting or sculpting.  I do however bump on things I think are worth sharing with the rest of you.  One of these things are the candles I include on my Blood Angels.  As the picture shows; it’s all fairly straight forward.

First I use a tooth pick cut it to length.
Next up are the dripping lines.  I do those by just adding green stuff to the sides and making vertical carves with a needle like sculpting tool. Top of the candle is made by pushing a ballpoint tool on the top The drop is made by pushing at the end of the drop
Third part is the flame.  I do this by just rolling a little egg like form and carefully pushing it in place with the needle point (sometimes using a little glue)

I use greenstuff for these kind of things as it gives a better curing effect.  I like using brown stuff, but it gets a more straight finish; Green stuff tends to curve slightly when handled, and candles tend to do the same :o)

Hope it inspired some people.
If you’ve got pointers or experiences; let me know.

Cheerz
griffit

Power cables

Greetz one and all,

Today I’m not showing my progress of one or the other project, I’ll try to give you some kind of tutorial instead. I’ve seen various techniques to make power cables going from greenstuffing to guitar strings and just buying a pewter version.

Me I make my own cables using metal wire, I like the result and this is how I do it.

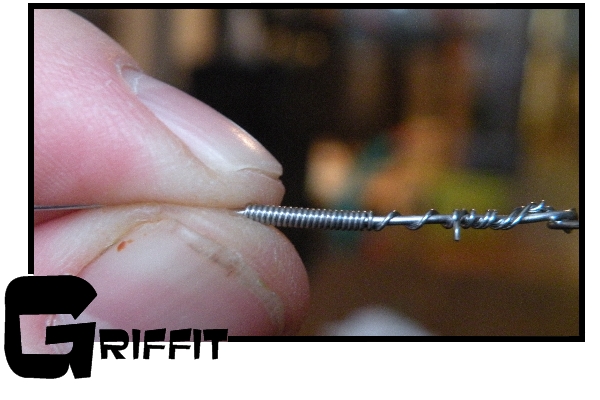
First pick your metal wire. I’ve got a rather thin (coated) one for the exterior line and a slightly thicker one for the core.

Wrap the small one around the ticker wire. Its just a lot of turning on the core wire, but all in all not a difficult job at all. (you do have to make sure the exterior cable (small one) is long enough).

Cut off the excess at start and end.

Glue in to place. And complete it with some last GS detailing

Hope you liked it.
Griffit

the men need more men

Greetings one and all,


I’m not one to brag or praise my self. But some ppl on various forums asked me to make a step by step of some mini’s.


Click for bigger pic

1) take a bretonian met at arms

2) chop off at the middle (keep the legs)

3) Add chestplate (knights)
I chose the knights, not that I find them pretty; quite the opposite, but since lots of the detail will be blocked by the sword arms …

4) Add the sword arms (greatswords)

5) Add the head (outrides)
Enter the problem … one box comes with way to little heads; so if you got some to spare; give me a mail.

6) Add some details (various)
To make the greatswords a bit more special they all wear laurels and a lot of other stuff. You can add some more stuff or do some GS work here and there. But I didn’t come to that yet.

Well I hope it’s been helpful for those of you who want to copy.
Greetz

Griffit
And number 50 went live ;o)

Halflings for dinner

And here we are again;
2 posts in 1 day; must be my personal record.
A friend of mine (hi steven) asked me to make him some Halflings for a new super secret project for our club.
How to make halflings in 1 dinner

Ingredients:

1 courgette
2 red paprika’s
1l un spoiled water
1 Spice cube
1 goblin
1 halberd arm (bretonia)
1 head of choise
A pinch brown stuff.

First slice all your vegetables in small pieces and put on a light stove and brace with some butter.

Meanwhile you take the goblin and chop of the spear arm and head

Take a look at the vegetables; these should be braced lightly; add the water and leave to cook

Trim the neck and arm of your choise
Glue them on the goblin with super glue.

Take a look at the soup if the water is boiling add the spice cube.

Meanwhile the glue should have dried, and you are ready to add the brown stuff.

First off the belly, some puffy sleeves and last but not least the cheeks

Now your soup should be ready; pour your self a cup and enjoy for a moment.

Take a small walk trough the garden and enjoy the sound of the birds singing, the gentle touch of the wind through your hair. Take your last sip from the soup and go back in.

Your brown stuff should have cured for a bit by now. Time to do the finishing touches.

Adding the jacket, hair; and all other sorts of details


By now it should be time to start cooking diner. Put the Halfling on the shelve and start by picking your meat and vegetables

LinkWithin

Related Posts with Thumbnails